Ring Dynamometers: Analog and Digital Force Measurement
Tiedemann dynamometers, manufactured for more than 60 years, offers high precision instruments for mechanical force measurements for tensile and compressive forces. The measurement range of the ring dynamometers goes from 50 Newton (11.24045 lbs) to 200 kN.(44961.7887742 lbs)
Applications
The Tiedemann dynamometers are always used where measurements may allow only minimal length changes. They are applied in the measurement of cable tension on overhead wires, as an extension would lead to an increase of slack span. Other applications include high-precision measurements in mechanical engineering and vehicle manufacturing e.g. in test stands for brakes, in machinery and transport equipment, as well as in measurements where only little room for the measuring instrument is available. Their handling is very easy. The digital version finds further applications in laboratories of R&D, quality and manufacturing control. They are small and easy to use as well. They do not need any amplifier or mains. You can read the forces directly on the screen or via USB cable on your notebook.


Execution of the Dynamometer
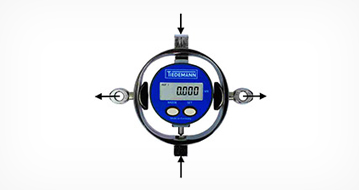
The ring dynamometer consists of a special shaped elastic steel ring attached with two facing drawbar eyes, pressure seats or threads. A load on the ring leads to a slight

deformation, which is measured with a precise dial gauge.
Analogue Indicator – Measured Value and Maximal Load
The measured deformation is converted through a calibration table into tensile or compressive forces.
The mechanical, analogue 100-dial indicator shows a change in diameter of the ring of 5 microns per division. The ring will deform less than 2.0 mm. The error on accuracy is less than 0.3%.
On Tiedemann dynamometers, the indicator can be set in such a way that it displays the maximum force in one measuring run. This is of advantage for fast processes and during experiments where reading of scale is difficult or not possible, as may be the case in determining the drag resistance of gliders, towed trailers and boats or an operation force at a inapproachable.

Analogous Dynamometer with Drawn Scale
Analogue dynamometers with a drawn scale are first calibrated according to the same method. Then a drawn scale with interpolated force values will replace the standard scale for one arbitrary rotation of the dial gauge. The measurement range then becomes smaller e.g. 0-60 N or 60-120 N for ZS02.
Digital Indicator

The digital indicator has maximal three digits (1 µm) and will be programmed by Tiedemann during calibration to show the forces direct in N or kN. The smallest measurable force is 0.1 N or 1 N. The max ranges for the digital dynamometer starts from 200 N to 100 kN.
Tensile forces will be marked with a “+“, compression force with the “–“. In case of our Universal- Dynamometer with drawbar eyes and pressure seats the calibration curve for tensile and compressive force has to be chosen. Further you can set the digits always to “0” by pressing the “Tara” button, but please do not forget the max load for the ring.
Besides the direct reading of the forces on the display the major advantage is the direct connection to a computer to run

measurement programs and save the force results. In this case the battery box for the battery (4000 hours) will be exchanged against a cable connection with USB or RS232. You do not need any further instruments or an external power supply.
The indicator itself will be supplied by the power of the notebook. Tiedemann provides the indicator driver and a basic capture program to transfer the measurement data to WIN-Excel. Alternative any other measurement program can be used.
In cases a wireless connection is of interest or if an application requires more than one dynamometer, you can connect them via a HUB. These technologies are provided by different external partners.
Special Designs and Protectors
We also offer a splash protective rubber cover on some of our instruments, rotating drawbar eyes or dynamometers with modified seats for compressive forces.

Choice of Dynamometer and Calibration
The ring dynamometers are available with various methods in execution. Depending on the design the measurement range lasts from 50 N up to 200 kN.
The universal dynamometers are combination instruments for tensile or compressive forces. Drawbar eyes carry the tensile force whereas pressure seats take the compressive force. Alternative both forces can be connected via screw bolts. Other pure tensile and compression dynamometers are available as well.
The dynamometers are designed for specific ranges that may not be exceeded, not even temporarily by shock. Thus, if the measured force is not exactly known or you are not sure that the force is free of shocks, then the next strongest ring has to be chosen. For continuous (1 hour or longer) or permanent changing loads, only 80% of the maximum of measuring range may be used.
Calibration
The calibration of the dynamometers with a maximum load up to 100 kN is done with force measuring equipment at Tiedemann. The accuracy of our calibration device is certified periodically by the measurement office of material testing of University Stuttgart. It is classified into the grade of quality 0.5 (highest possible accuracy) according to DIN 51220. Instruments with a higher load are calibrated by the University.
Therefore, it is traceable in all cases to the official comparison standard according to ISO 9000ff.
Calibration Table
 The determination of the calibration values (10 steady steps from zero to the maximum load) occurs according to the internal testing method following DIN 51301 (increasing and decreasing load and for indication for maximum load). The values are determined separately for each device and slightly corrected according to a compensation curve of minimal quadratic divergence (polynomial of degree 3). By this, incorrect values or irregularities in the dial indicator can be recognized before delivery. The calibration curve through the 10 given values is almost straight for tensile forces, but slightly curved for compressive force.
For analogue dynamometers a calibration table or a drawn scale for direct readable values is provided, for digital indicators the calibration is saved in the indicator. The indicator shows the values directly in N or kN
Important Instructions
The calibrated dynamometers must not be modified after delivery. If the drawbar eyes for tensile forces or the seats for compressive forces are turned or removed, the rigidity of the whole device will be changed. The calibration table and the maximum load are no longer valid.
Tensile forces must always be fed in with a bolt intended for the size of the device (dimension d). Thinner bolts will lead to  deformation or breakage of the drawbar eye. As an alternative we offer special high strength steel shackles.
Compressive forces are preferably fed in by steel balls:
Diameter of balls up to 10 kN up to 100 kN up to 200 kN
about 7 mm about 15 mm about 25 mm
The ring of the dynamometer must not be engraved or it will be in danger of breakage.
Repair and Calibration Services
According to DIN 51301, the testing certificate is valid for only 24 months. Therefore, it is recommended to recalibrate the device after this period.
Tiedemann will provide this calibration service. The performance of the dynamometer is examined before calibration. In case the dynamometer is from Tiedemann, damaged parts are replaced by new ones automatically. After recalibration, our company will deliver a practically new instrument.
If required Tiedemann would provide a test certificate showing the repair and calibration for dynamometers with a maximum load of 100 kN (necessary for quality control according ISO 9000ff.) Additionally and for dynamometers for higher forces, an official test certificate from the measurement office of material testing can be provided.
Technical Data
The following pages show all configurations and the technical data for:
- – Analogue Universal Dynamometers for tensile or compressive force with calibration table.
- – Analogue Universal Dynamometers with screw joint for tension and compression with calibration table
- – Analogue Compressive Force Dynamometers with calibration table or drawn scale for direct read
- – Analogue Tensile Force Dynamometers with calibration table or drawn scale for direct read The digital Ring-Dynamometers have the same shapes as the analogue types. We offer the same four different types. However the range is limited to 200 N to 100 kN. The name of the Dynamometer is marked with the symbol “dig.” behind the name like U-5 dig or Z-1dig.
The two optional cables for PC connection have to be ordered separately. They come with the Tiedemann-Capture-Program incl. indicator driver.
| Diameter of balls | up to 10 kN | about 7 mm |
| up to 100 kN | about 15 mm | |
| up to 200 kN | about 25 mm |
Brochure Tiedemann Dynamometers 2013
[su_divider style=”double” size=”2″]



There are no reviews yet.